Marked this version for translation |
Marked this version for translation |
||
| (16 intermediate revisions by 2 users not shown) | |||
| Line 1: | Line 1: | ||
<languages /> | <languages /> | ||
<translate> | <translate> | ||
<!--T:44--> | |||
<span style="color: #ff0090; font-weight: bold; text-align: center; margin: 2em; font-size: 125%;">This page is the old documentation for early versions of Siril 0.9. Please refer to the new documentation on [https://siril.readthedocs.io/en/stable/ siril.readthedocs.io] or the new tutorials on [https://siril.org/tutorials siril.org] instead.</span> | |||
=Manual page for Siril= <!--T:1--> | =Manual page for Siril= <!--T:1--> | ||
<!--T:2--> | <!--T:2--> | ||
This | This was the main documentation page for [[Siril]], a free software for astronomy image processing. It contains several video tutorials and links to other pages that contains pictures or videos. Many features are documented by a video. The processing workflows for deep-sky and planetary are documented as a series of pictures with text or as a film in the [[#Tutorial_for_a_complete_sequence_processing|complete sequence processing]] section. | ||
==A powerful astronomy image viewer== <!--T:3--> | ==A powerful astronomy image viewer== <!--T:3--> | ||
| Line 15: | Line 19: | ||
*Squared: squared of each pixel. What can be seen with this mode is mainly the brightest part of the image. | *Squared: squared of each pixel. What can be seen with this mode is mainly the brightest part of the image. | ||
*Asinh: the inverse hyperbolic sine is commonly used, it reproduces the perceptual ability of the human eye, which can accommodate to perceive dramatically different levels of brightness simultaneously. Asinh is close to the logarithm mode but has a better behaviour around zero. | *Asinh: the inverse hyperbolic sine is commonly used, it reproduces the perceptual ability of the human eye, which can accommodate to perceive dramatically different levels of brightness simultaneously. Asinh is close to the logarithm mode but has a better behaviour around zero. | ||
*AutoStretch: Siril performs an automatic screen stretch. | |||
*Histogram: the histogram equalisation. It increases the contrast of the image by increasing the dynamic range of intensity given to pixels with the most probable intensity values. It is very valuable to evaluate all the signal contained in the image. | *Histogram: the histogram equalisation. It increases the contrast of the image by increasing the dynamic range of intensity given to pixels with the most probable intensity values. It is very valuable to evaluate all the signal contained in the image. | ||
| Line 24: | Line 29: | ||
<!--T:7--> | <!--T:7--> | ||
< | <html><video controls width="750"> | ||
<source src="/videos/Display.webm" type="video/webm"> | |||
Sorry, your browser doesn't support embedded videos. | |||
</video></html> | |||
<!--T:8--> | <!--T:8--> | ||
| Line 39: | Line 47: | ||
* [[Siril:Tutorial_sequence|Work on a sequence of converted images]] | * [[Siril:Tutorial_sequence|Work on a sequence of converted images]] | ||
* [[Siril:Tutorial_preprocessing|Pre-processing images]] | * [[Siril:Tutorial_preprocessing|Pre-processing images]] | ||
* [[Siril:Tutorial_manual_registration|Registration ( | * [[Siril:Tutorial_manual_registration|Registration (Global star alignment)]] | ||
* [[Siril:Tutorial_stacking|Stacking]] | * [[Siril:Tutorial_stacking|Stacking]] | ||
| Line 46: | Line 54: | ||
<!--T:33--> | <!--T:33--> | ||
< | <html><video controls width="750"> | ||
<source src="/videos/mars_processing.webm" type="video/webm"> | |||
Sorry, your browser doesn't support embedded videos. | |||
</video></html> | |||
==Process your single images== <!--T:9--> | ==Process your single images== <!--T:9--> | ||
| Line 58: | Line 69: | ||
When an image contains an intense light pollution, it is useful to remove it. Siril provides a "Background Extraction" tool in order to remove the gradient of the sky background. Siril uses a polynomial up to the fourth degree. The 4th degree polynomial is generally a good choice, for this model, though the tool allows for first to fourth degree. | When an image contains an intense light pollution, it is useful to remove it. Siril provides a "Background Extraction" tool in order to remove the gradient of the sky background. Siril uses a polynomial up to the fourth degree. The 4th degree polynomial is generally a good choice, for this model, though the tool allows for first to fourth degree. | ||
<!--T: | <!--T:43--> | ||
<html><video controls width="750"> | |||
<source src="/videos/BackgroundExtraction.webm" type="video/webm"> | |||
Sorry, your browser doesn't support embedded videos. | |||
</video></html> | |||
<!--T:12--> | <!--T:12--> | ||
| Line 77: | Line 91: | ||
<!--T:17--> | <!--T:17--> | ||
The colour calibration tool performs a balancing of the colours of a linear RGB deep-sky image. This video tutorial shows how to use the tool. Note that Background Equalization (now called Background Neutralization) has been moved in the calibration box because it is needed before any calibration. | The colour calibration tool performs a balancing of the colours of a linear RGB deep-sky image. This video tutorial shows how to use the tool. Note that Background Equalization (now called Background Neutralization) has been moved in the calibration box because it is needed before any calibration. | ||
<!--T:18--> | <!--T:18--> | ||
< | <html><video controls width="750"> | ||
<source src="/videos/Color_Calibration.webm" type="video/webm"> | |||
Sorry, your browser doesn't support embedded videos. | |||
</video></html> | |||
===Reducing green tint in processed images=== <!--T:19--> | ===Reducing green tint in processed images=== <!--T:19--> | ||
| Line 88: | Line 104: | ||
<!--T:21--> | <!--T:21--> | ||
< | <html><video controls width="750"> | ||
<source src="/videos/RemoveGreen.webm" type="video/webm"> | |||
Sorry, your browser doesn't support embedded videos. | |||
</video></html> | |||
===Fast Fourier Transform (FFT)=== | <!--T:22--> | ||
===Fast Fourier Transform (FFT)=== | |||
A FFT algorithm is integrated to Siril in order to provide you a tool to evaluate fixed pattern noise of an image. You can thus remove the frequency pattern of the noise in the modulus file and save the result. Modulus and phase are saved in different files so you can compute the inverse transformation to retrieve the corrected image. | A FFT algorithm is integrated to Siril in order to provide you a tool to evaluate fixed pattern noise of an image. You can thus remove the frequency pattern of the noise in the modulus file and save the result. Modulus and phase are saved in different files so you can compute the inverse transformation to retrieve the corrected image. | ||
<!--T:23--> | <!--T:23--> | ||
< | <html><video controls width="750"> | ||
<source src="/videos/FFT.webm" type="video/webm"> | |||
Sorry, your browser doesn't support embedded videos. | |||
</video></html> | |||
===Tutorial for a complete image processing=== | <!--T:39--> | ||
===Tutorial for a complete image processing=== | |||
An illustrated tutorial has been compiled to describe the usual [[Siril:Processing_tutorial|processing steps]] for a single image processing, starting from the stacked file. | An illustrated tutorial has been compiled to describe the usual [[Siril:Processing_tutorial|processing steps]] for a single image processing, starting from the stacked file. | ||
<!--T:24--> | |||
==RGB Compositing== | |||
A new channel synthesis tool is provided in Siril. This tool allows you to mix and align up to 7 channels plus one for Luminance. The tool handles the binning, just make sure to not crop the picture before: the bin1x1 MUST be loaded first to give the composited image dimensions. | A new channel synthesis tool is provided in Siril. This tool allows you to mix and align up to 7 channels plus one for Luminance. The tool handles the binning, just make sure to not crop the picture before: the bin1x1 MUST be loaded first to give the composited image dimensions. | ||
| Line 111: | Line 136: | ||
<!--T:27--> | <!--T:27--> | ||
< | <html><video controls width="750"> | ||
<source src="/videos/RGB_compositing.webm" type="video/webm"> | |||
Sorry, your browser doesn't support embedded videos. | |||
</video></html> | |||
<!--T:28--> | <!--T:28--> | ||
< | <html><video controls width="750"> | ||
<source src="/videos/RGB_compositing2.webm" type="video/webm"> | |||
Sorry, your browser doesn't support embedded videos. | |||
</video></html> | |||
==Astrometry== <!--T:34--> | ==Astrometry== <!--T:34--> | ||
Latest revision as of 22:24, 16 September 2023
This page is the old documentation for early versions of Siril 0.9. Please refer to the new documentation on siril.readthedocs.io or the new tutorials on siril.org instead.
Manual page for Siril
This was the main documentation page for Siril, a free software for astronomy image processing. It contains several video tutorials and links to other pages that contains pictures or videos. Many features are documented by a video. The processing workflows for deep-sky and planetary are documented as a series of pictures with text or as a film in the complete sequence processing section.
A powerful astronomy image viewer
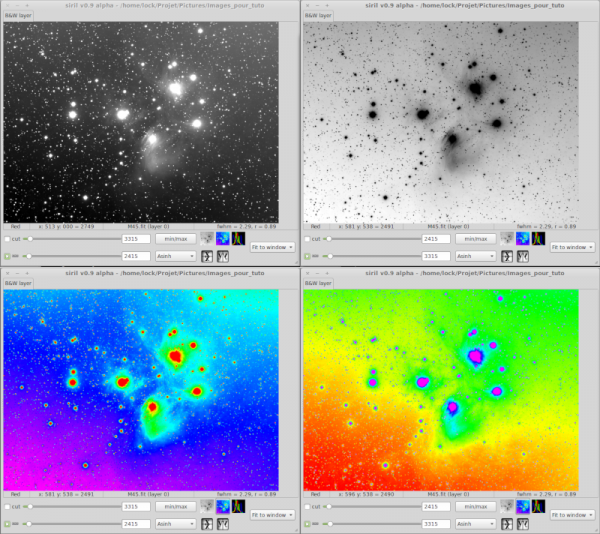
A Display Mode viewer is used to improve the visibility of an image, but without altering its pixel data in any way, similarly to what DS9 scale does.
- Linear: the default mode in Siril. Pixels are displayed from the darkest to the brightest in a linear scale.
- Logarithm: the logarithmic scale. The operation emphases simultaneously information in faint and bright levels of the image.
- Square root: the square root of each pixel. The result is close to the logarithm mode's.
- Squared: squared of each pixel. What can be seen with this mode is mainly the brightest part of the image.
- Asinh: the inverse hyperbolic sine is commonly used, it reproduces the perceptual ability of the human eye, which can accommodate to perceive dramatically different levels of brightness simultaneously. Asinh is close to the logarithm mode but has a better behaviour around zero.
- AutoStretch: Siril performs an automatic screen stretch.
- Histogram: the histogram equalisation. It increases the contrast of the image by increasing the dynamic range of intensity given to pixels with the most probable intensity values. It is very valuable to evaluate all the signal contained in the image.
All these modes can also be applied independently on each layer, when layer chaining is disabled.
This video tutorial shows the different modes you can use to display your images.
In addition to this, Siril provides different colour maps display, including false colour rendering.

Tutorial for a complete sequence processing
An illustrated tutorial has been compiled to describe the usual processing steps, starting from RAW DSLR images to stacking.
- Convert your images in the FITS format Siril uses (image import)
- Work on a sequence of converted images
- Pre-processing images
- Registration (Global star alignment)
- Stacking
A video tutorial is also available to describe the usual planetary processing.
Process your single images
It is one thing to process a sequence of images, and another to work on only one image, generally the result of this processing. This section documents the most useful features for one-image processing.
Background extraction
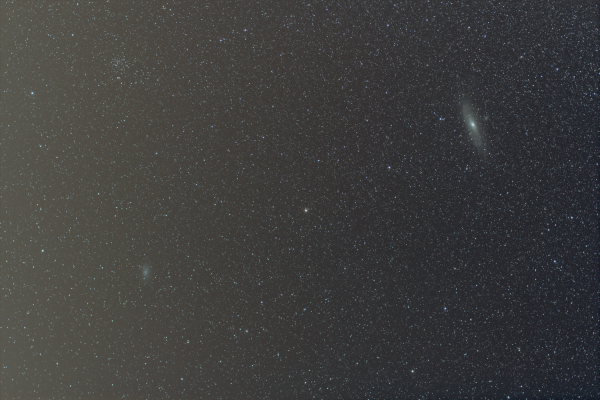
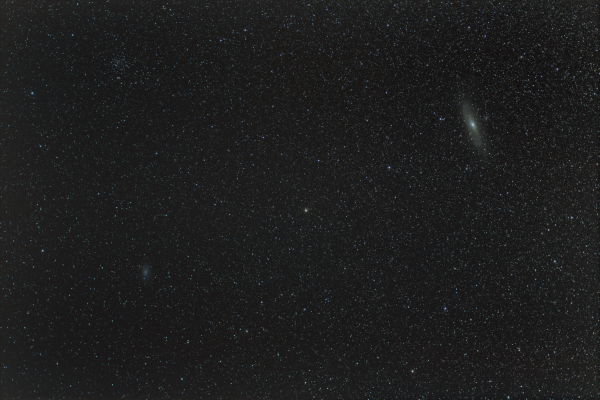
When an image contains an intense light pollution, it is useful to remove it. Siril provides a "Background Extraction" tool in order to remove the gradient of the sky background. Siril uses a polynomial up to the fourth degree. The 4th degree polynomial is generally a good choice, for this model, though the tool allows for first to fourth degree.
After extraction you can switch between image and background view in order to check the result. If you are satisfied you can thus apply the correction (subtraction or division). The subtraction operation is very different from the simple operation used for the darks and bias/offsets. Indeed, as the level of the background is identical to the one of the image, applying a simple subtraction would result in a image with a lot of black pixels. To avoid any inconvenience, the operation is done with 32-bit signed integers and finally converted into native format (16-bits unsigned).
Following, respectively, the start image and final image (after background extraction with subtraction and equalization):
Color calibration
The colour calibration tool performs a balancing of the colours of a linear RGB deep-sky image. This video tutorial shows how to use the tool. Note that Background Equalization (now called Background Neutralization) has been moved in the calibration box because it is needed before any calibration.
Reducing green tint in processed images
This video tutorial shows how to remove the green tint in processed images using the graphical user interface. This function can also be accessed from the command line, with the rmgreen command.
Fast Fourier Transform (FFT)
A FFT algorithm is integrated to Siril in order to provide you a tool to evaluate fixed pattern noise of an image. You can thus remove the frequency pattern of the noise in the modulus file and save the result. Modulus and phase are saved in different files so you can compute the inverse transformation to retrieve the corrected image.
Tutorial for a complete image processing
An illustrated tutorial has been compiled to describe the usual processing steps for a single image processing, starting from the stacked file.
RGB Compositing
A new channel synthesis tool is provided in Siril. This tool allows you to mix and align up to 7 channels plus one for Luminance. The tool handles the binning, just make sure to not crop the picture before: the bin1x1 MUST be loaded first to give the composited image dimensions.
The first video shows a mixing between L, R, G and B channels with same size and no alignments needed: the L channel is given by an H-alpha processed image. This second video shows mixing between images with different binning. The alignment is also required.
After mixing, save your result and process it as you want.
Astrometry
Siril provides a few astrometry tools.
In particular, the PSF function that uses the Levenberg–Marquardt algorithm for minimization.
See the dedicated page for a video tutorial.

