Importing a new version from external source |
Updating to match new version of source page |
||
| (12 intermediate revisions by the same user not shown) | |||
| Line 1: | Line 1: | ||
<languages /> | <languages /> | ||
<span style="color: #ff0090; font-weight: bold; text-align: center; margin: 2em; font-size: 125%;">This page is the old documentation for early versions of Siril 0.9. Please refer to the new documentation on [https://siril.readthedocs.io/en/stable/ siril.readthedocs.io] or the new tutorials on [https://siril.org/tutorials siril.org] instead.</span> | |||
=Siril processing tutorial= | =Siril processing tutorial= | ||
| Line 6: | Line 8: | ||
* [[Siril:Tutorial_sequence|Work on a sequence of converted images]] | * [[Siril:Tutorial_sequence|Work on a sequence of converted images]] | ||
* [[Siril:Tutorial_preprocessing|Pre-processing images]] | * [[Siril:Tutorial_preprocessing|Pre-processing images]] | ||
* → '''Registration ( | * → '''Registration (Global star alignment)''' | ||
* [[Siril:Tutorial_stacking|Stacking]] | * [[Siril:Tutorial_stacking|Stacking]] | ||
==Registration ( | ==Registration (Global star alignment)== | ||
Siril has four automatic registration tools. In this example we will use the all automatic one: Global star alignment. This method is dedicated to the deep-sky registration, and contrary to the One Star registration, it handles the rotation of images between each others. | |||
From this tab, you can change the image being viewed in the grey and colour windows, include or exclude them from a user-defined selection that will later be used to indicate which files should be stacked or not, and set the reference image. While browsing through the images of the sequence, a reference image may be set to a specific image if you think it has a better quality than the others, or if it's best centred. Note that when the reference image is set, it will be saved in the sequence and it will be opened first when loading the sequence the following time. | After debayering (in previous step), the new sequence is loaded and you can check it in the "image sequences" tab. From this tab, you can change the image being viewed in the grey and colour windows, include or exclude them from a user-defined selection that will later be used to indicate which files should be stacked or not, and set the reference image. While browsing through the images of the sequence, a reference image may be set to a specific image if you think it has a better quality than the others, or if it's best centred. Note that when the reference image is set, it will be saved in the sequence and it will be opened first when loading the sequence the following time. | ||
An alternative to the use of buttons of the sequence tab is to use the ''sequence list''. | An alternative to the use of buttons of the sequence tab is to use the ''sequence list''. Click on the dedicated button [[File:Siril_button_seq.png|24px|frameless|link=|middle]]. | ||
[[File:Siril sequence list.png|700px]] | [[File:Siril sequence list.png|700px]] | ||
To make registration, just click on "Go Register" button. Everything will be automatic. The algorithm tries to match triangle patterns in order to align images and you can check each step of registration in the console output. | |||
[[File:Siril_global_star_reg.png|700px]] | |||
A new sequence will be created and automatically loaded at the end of the process. In addition, an average of FWHM is computed and provided in this sequence. It is thus possible to select best images for stacking. | |||
[[File: | ===Special cases with low sigma/noise ratio=== | ||
In some cases, due to high noise level, automatic registration gives wrong results by confusing noise and stars during star detection. To overcome this issue, Siril provides parameters adjustable parameters offering a better tool detection. These parameters are located in the Dynamic PSF window. | |||
[[File:Siril_PSF_param.png|700px]] | |||
In our case, increasing thershold value will give better results. | |||
Next item of the tutorial: [[Siril:Tutorial_stacking|Stacking]]. | Next item of the tutorial: [[Siril:Tutorial_stacking|Stacking]]. | ||
Latest revision as of 22:57, 16 September 2023
This page is the old documentation for early versions of Siril 0.9. Please refer to the new documentation on siril.readthedocs.io or the new tutorials on siril.org instead.
Siril processing tutorial
- Convert your images in the FITS format Siril uses (image import)
- Work on a sequence of converted images
- Pre-processing images
- → Registration (Global star alignment)
- Stacking
Registration (Global star alignment)
Siril has four automatic registration tools. In this example we will use the all automatic one: Global star alignment. This method is dedicated to the deep-sky registration, and contrary to the One Star registration, it handles the rotation of images between each others.
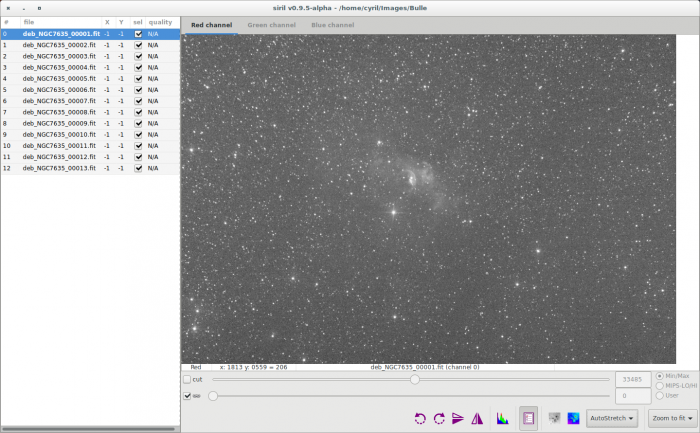
After debayering (in previous step), the new sequence is loaded and you can check it in the "image sequences" tab. From this tab, you can change the image being viewed in the grey and colour windows, include or exclude them from a user-defined selection that will later be used to indicate which files should be stacked or not, and set the reference image. While browsing through the images of the sequence, a reference image may be set to a specific image if you think it has a better quality than the others, or if it's best centred. Note that when the reference image is set, it will be saved in the sequence and it will be opened first when loading the sequence the following time.
An alternative to the use of buttons of the sequence tab is to use the sequence list. Click on the dedicated button ![]() .
.
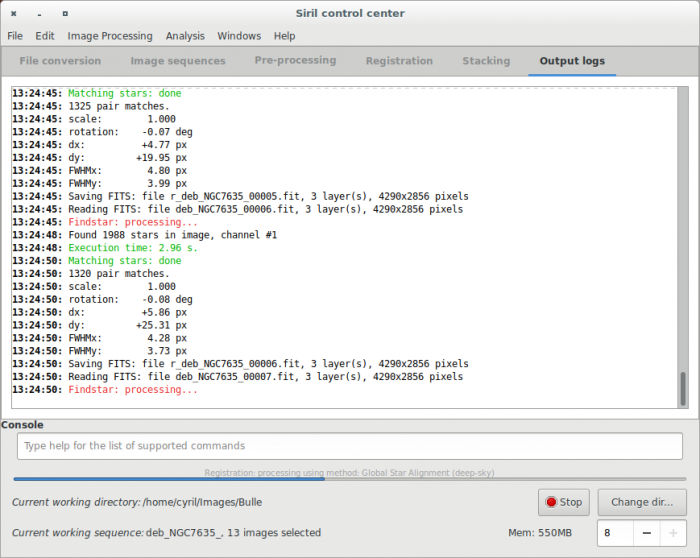
To make registration, just click on "Go Register" button. Everything will be automatic. The algorithm tries to match triangle patterns in order to align images and you can check each step of registration in the console output.
A new sequence will be created and automatically loaded at the end of the process. In addition, an average of FWHM is computed and provided in this sequence. It is thus possible to select best images for stacking.
Special cases with low sigma/noise ratio
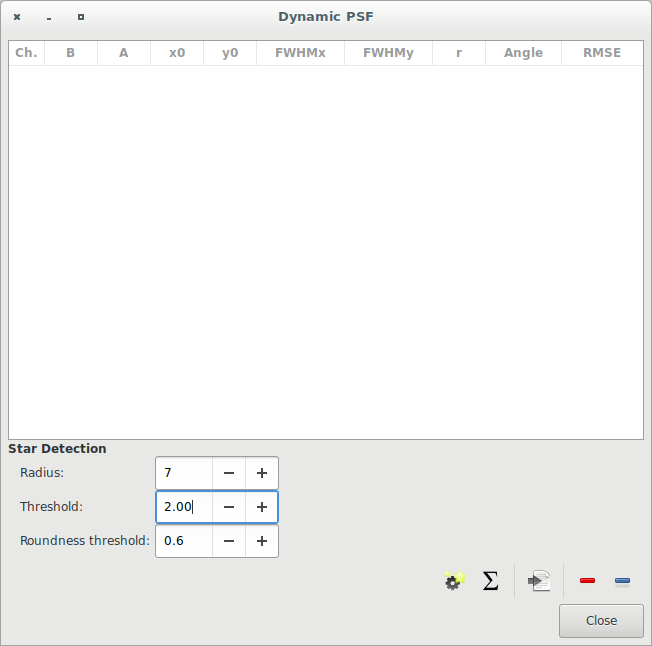
In some cases, due to high noise level, automatic registration gives wrong results by confusing noise and stars during star detection. To overcome this issue, Siril provides parameters adjustable parameters offering a better tool detection. These parameters are located in the Dynamic PSF window.

In our case, increasing thershold value will give better results.
Next item of the tutorial: Stacking.

